Deprecated: Creation of dynamic property WP_Term::$cat_ID is deprecated in /home/reshajt1/public_html/wp-includes/category.php on line 378
Deprecated: Creation of dynamic property WP_Term::$category_count is deprecated in /home/reshajt1/public_html/wp-includes/category.php on line 379
Deprecated: Creation of dynamic property WP_Term::$category_description is deprecated in /home/reshajt1/public_html/wp-includes/category.php on line 380
Deprecated: Creation of dynamic property WP_Term::$cat_name is deprecated in /home/reshajt1/public_html/wp-includes/category.php on line 381
Deprecated: Creation of dynamic property WP_Term::$category_nicename is deprecated in /home/reshajt1/public_html/wp-includes/category.php on line 382
Deprecated: Creation of dynamic property WP_Term::$category_parent is deprecated in /home/reshajt1/public_html/wp-includes/category.php on line 383
Deprecated: Creation of dynamic property WP_Term::$cat_ID is deprecated in /home/reshajt1/public_html/wp-includes/category.php on line 378
Deprecated: Creation of dynamic property WP_Term::$category_count is deprecated in /home/reshajt1/public_html/wp-includes/category.php on line 379
Deprecated: Creation of dynamic property WP_Term::$category_description is deprecated in /home/reshajt1/public_html/wp-includes/category.php on line 380
Deprecated: Creation of dynamic property WP_Term::$cat_name is deprecated in /home/reshajt1/public_html/wp-includes/category.php on line 381
Deprecated: Creation of dynamic property WP_Term::$category_nicename is deprecated in /home/reshajt1/public_html/wp-includes/category.php on line 382
Deprecated: Creation of dynamic property WP_Term::$category_parent is deprecated in /home/reshajt1/public_html/wp-includes/category.php on line 383
Deprecated: Creation of dynamic property WP_Term::$cat_ID is deprecated in /home/reshajt1/public_html/wp-includes/category.php on line 378
Deprecated: Creation of dynamic property WP_Term::$category_count is deprecated in /home/reshajt1/public_html/wp-includes/category.php on line 379
Deprecated: Creation of dynamic property WP_Term::$category_description is deprecated in /home/reshajt1/public_html/wp-includes/category.php on line 380
Deprecated: Creation of dynamic property WP_Term::$cat_name is deprecated in /home/reshajt1/public_html/wp-includes/category.php on line 381
Deprecated: Creation of dynamic property WP_Term::$category_nicename is deprecated in /home/reshajt1/public_html/wp-includes/category.php on line 382
Deprecated: Creation of dynamic property WP_Term::$category_parent is deprecated in /home/reshajt1/public_html/wp-includes/category.php on line 383
Deprecated: Creation of dynamic property WP_Term::$cat_ID is deprecated in /home/reshajt1/public_html/wp-includes/category.php on line 378
Deprecated: Creation of dynamic property WP_Term::$category_count is deprecated in /home/reshajt1/public_html/wp-includes/category.php on line 379
Deprecated: Creation of dynamic property WP_Term::$category_description is deprecated in /home/reshajt1/public_html/wp-includes/category.php on line 380
Deprecated: Creation of dynamic property WP_Term::$cat_name is deprecated in /home/reshajt1/public_html/wp-includes/category.php on line 381
Deprecated: Creation of dynamic property WP_Term::$category_nicename is deprecated in /home/reshajt1/public_html/wp-includes/category.php on line 382
Deprecated: Creation of dynamic property WP_Term::$category_parent is deprecated in /home/reshajt1/public_html/wp-includes/category.php on line 383
Deprecated: Creation of dynamic property WP_Term::$cat_ID is deprecated in /home/reshajt1/public_html/wp-includes/category.php on line 378
Deprecated: Creation of dynamic property WP_Term::$category_count is deprecated in /home/reshajt1/public_html/wp-includes/category.php on line 379
Deprecated: Creation of dynamic property WP_Term::$category_description is deprecated in /home/reshajt1/public_html/wp-includes/category.php on line 380
Deprecated: Creation of dynamic property WP_Term::$cat_name is deprecated in /home/reshajt1/public_html/wp-includes/category.php on line 381
Deprecated: Creation of dynamic property WP_Term::$category_nicename is deprecated in /home/reshajt1/public_html/wp-includes/category.php on line 382
Deprecated: Creation of dynamic property WP_Term::$category_parent is deprecated in /home/reshajt1/public_html/wp-includes/category.php on line 383
Deprecated: Creation of dynamic property WP_Term::$cat_ID is deprecated in /home/reshajt1/public_html/wp-includes/category.php on line 378
Deprecated: Creation of dynamic property WP_Term::$category_count is deprecated in /home/reshajt1/public_html/wp-includes/category.php on line 379
Deprecated: Creation of dynamic property WP_Term::$category_description is deprecated in /home/reshajt1/public_html/wp-includes/category.php on line 380
Deprecated: Creation of dynamic property WP_Term::$cat_name is deprecated in /home/reshajt1/public_html/wp-includes/category.php on line 381
Deprecated: Creation of dynamic property WP_Term::$category_nicename is deprecated in /home/reshajt1/public_html/wp-includes/category.php on line 382
Deprecated: Creation of dynamic property WP_Term::$category_parent is deprecated in /home/reshajt1/public_html/wp-includes/category.php on line 383
Deprecated: Implicit conversion from float 1789273704.555846 to int loses precision in /home/reshajt1/public_html/wp-content/plugins/intelly-related-posts/includes/classes/utils/Logger.php on line 93
Selamat datang di Blog saya, kali ini saya akan membagikan aplikasi aplikasi untuk remote dari rumah. apasih itu remote yang saya maksud ?. remote yang saya maksud disini adalah, anda dapat mengakses nya secara penuh, anda dapat bertukar file, menggerakan mouse nya, membuka aplikasi nya. dan masih banyak lagi Remote Desktop Siapa yang tidak tahu …
The post 5 Aplikasi untuk me Remote dari jarak jauh, cocok untuk anda yang WFH (Work From Home ) appeared first on ReshaJTama.
]]>Deprecated: Creation of dynamic property WP_Block::$attributes is deprecated in /home/reshajt1/public_html/wp-includes/class-wp-block.php on line 179
Deprecated: Creation of dynamic property WP_Block::$attributes is deprecated in /home/reshajt1/public_html/wp-includes/class-wp-block.php on line 179
Deprecated: Creation of dynamic property WP_Block::$attributes is deprecated in /home/reshajt1/public_html/wp-includes/class-wp-block.php on line 179
Deprecated: Creation of dynamic property WP_Block::$attributes is deprecated in /home/reshajt1/public_html/wp-includes/class-wp-block.php on line 179
Deprecated: Creation of dynamic property WP_Block::$attributes is deprecated in /home/reshajt1/public_html/wp-includes/class-wp-block.php on line 179
Deprecated: Implicit conversion from float 1789273704.557713 to int loses precision in /home/reshajt1/public_html/wp-content/plugins/intelly-related-posts/includes/classes/utils/Logger.php on line 93
Deprecated: Implicit conversion from float 1789273704.557782 to int loses precision in /home/reshajt1/public_html/wp-content/plugins/intelly-related-posts/includes/classes/utils/Logger.php on line 93
- Remote Desktop
Siapa yang tidak tahu dengan aplikasi ini, ya Remote Desktop Protocol adalah salah satu service yang ada di windows, semua platform windows dapat menggunakan aplikasi ini dengan mudah, tetapi bukan berarti System operasi lain tidak bisa menggunakannya. sekarang linux juga dapat menggunakan Aplikasi ini dengan package tambahan seperti reminna, atau xrdp.
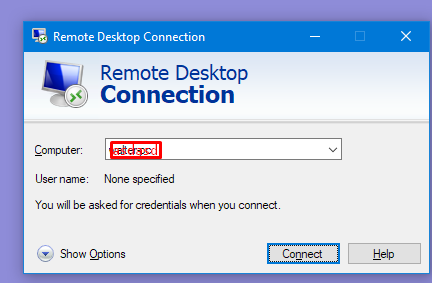
Untuk menggunakan Aplikasi ini ,komputer anda harus terkonek atau satu jaringan dengan komputer yang ingin di remote. atau anda bisa juga menggunakan ip public dengan cara ip forwadding.
- UltraVNC
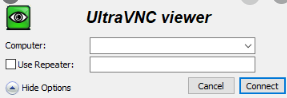
Ultra VNC adalah Aplikasi remote yang mudah di gunakan dan gratis, VNC menggunakan Remote Buffer Protocol (RFB) memungkinkan desktop dapat di lihat dan di kendalikan dari jarak jauh melalui internet. Sebelum remote, anda harus menjalankan server vnc pada komputer yang ingin anda remote. jadi initinya komputer peremote dan komputer yang akan di remote harus terinstall ultra vnc. aplikasi ini juga tidak terlalu besar. lalu jika koneksi anda terlalu kurang stabil, anda dapat mengurangi resulosi, warna pada layar komputer yang di remote, agar lebih enteng.
- Chrome Desktop
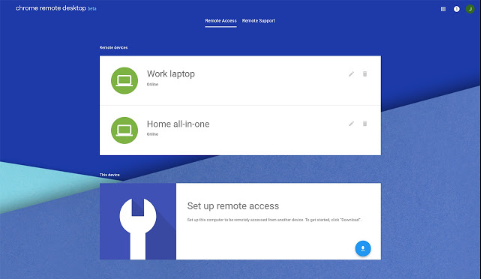
Aplikasi ini di buat oleh google. dengan cara membuka browser Chrome dari google kemudian kita install plugin “Chrome Desktop”, setelah di install anda akan masuk ke Account Google. tidak seperti Ultra VNC dan Remote Desktop, anda tidak perlu memasukan IP Address untuk me remote. anda hanya perlu memasukan Code Unik pada komputer yang anda remote dari google Chrome nya. jadi lebih aman, karena kita bisa mengubah ubah Code Unik nya.
- Team Viewer
Siapa yang tidak tau dengan team viewer, pasti kalian sering menggunakan aplikasi ini untuk meremote. aplikasi ini dapat di gunakan di segala platform. team viewer juga menggunakan Code Unik untuk dapat meremote komputer lain. tetapi ukuran dari aplikasi ini lumayan besar, tetapi dari ukurannya ini , aplikasi ini memiliki keunggulan dari aplikasi yang lain, yaitu dapat meremote, secara group, meeting, dan dapat save contact komputer yang di remote.

Anda dapat menggunakan aplikasi ini dengan menggunakan trial mode, karena pada dasar nya aplikasi ini berbayar
- Anydesk
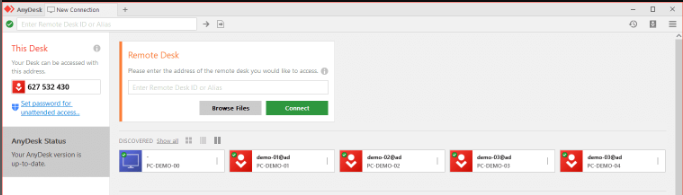
Anydesk sama dengan Team viewe, merupakan aplikasi berbayar. tetapi dia memiliki size yang kecil dan anda dapat menggunakan nya dengan mode trial. metode nya juga sama dengan chrome desktok dan team viewe, yaitu dengan Code Unik untuk meremote. aplikasi ini juga bisa di gunakan System Operasi apa saja atau Cross Platform. Aplikasi ini juga dapat di pasang pada Rasberry Pi, yaitu mikro controller.
Oke mungkin ini adalah aplikasi aplikasi untuk remote yang saya rekomendasikan kepada anda. semoga berguna dan bermanfaat.
The post 5 Aplikasi untuk me Remote dari jarak jauh, cocok untuk anda yang WFH (Work From Home ) appeared first on ReshaJTama.
]]>Deprecated: Creation of dynamic property WP_Term::$cat_ID is deprecated in /home/reshajt1/public_html/wp-includes/category.php on line 378
Deprecated: Creation of dynamic property WP_Term::$category_count is deprecated in /home/reshajt1/public_html/wp-includes/category.php on line 379
Deprecated: Creation of dynamic property WP_Term::$category_description is deprecated in /home/reshajt1/public_html/wp-includes/category.php on line 380
Deprecated: Creation of dynamic property WP_Term::$cat_name is deprecated in /home/reshajt1/public_html/wp-includes/category.php on line 381
Deprecated: Creation of dynamic property WP_Term::$category_nicename is deprecated in /home/reshajt1/public_html/wp-includes/category.php on line 382
Deprecated: Creation of dynamic property WP_Term::$category_parent is deprecated in /home/reshajt1/public_html/wp-includes/category.php on line 383
Deprecated: Creation of dynamic property WP_Term::$cat_ID is deprecated in /home/reshajt1/public_html/wp-includes/category.php on line 378
Deprecated: Creation of dynamic property WP_Term::$category_count is deprecated in /home/reshajt1/public_html/wp-includes/category.php on line 379
Deprecated: Creation of dynamic property WP_Term::$category_description is deprecated in /home/reshajt1/public_html/wp-includes/category.php on line 380
Deprecated: Creation of dynamic property WP_Term::$cat_name is deprecated in /home/reshajt1/public_html/wp-includes/category.php on line 381
Deprecated: Creation of dynamic property WP_Term::$category_nicename is deprecated in /home/reshajt1/public_html/wp-includes/category.php on line 382
Deprecated: Creation of dynamic property WP_Term::$category_parent is deprecated in /home/reshajt1/public_html/wp-includes/category.php on line 383
Deprecated: Creation of dynamic property WP_Term::$cat_ID is deprecated in /home/reshajt1/public_html/wp-includes/category.php on line 378
Deprecated: Creation of dynamic property WP_Term::$category_count is deprecated in /home/reshajt1/public_html/wp-includes/category.php on line 379
Deprecated: Creation of dynamic property WP_Term::$category_description is deprecated in /home/reshajt1/public_html/wp-includes/category.php on line 380
Deprecated: Creation of dynamic property WP_Term::$cat_name is deprecated in /home/reshajt1/public_html/wp-includes/category.php on line 381
Deprecated: Creation of dynamic property WP_Term::$category_nicename is deprecated in /home/reshajt1/public_html/wp-includes/category.php on line 382
Deprecated: Creation of dynamic property WP_Term::$category_parent is deprecated in /home/reshajt1/public_html/wp-includes/category.php on line 383
Deprecated: Creation of dynamic property WP_Term::$cat_ID is deprecated in /home/reshajt1/public_html/wp-includes/category.php on line 378
Deprecated: Creation of dynamic property WP_Term::$category_count is deprecated in /home/reshajt1/public_html/wp-includes/category.php on line 379
Deprecated: Creation of dynamic property WP_Term::$category_description is deprecated in /home/reshajt1/public_html/wp-includes/category.php on line 380
Deprecated: Creation of dynamic property WP_Term::$cat_name is deprecated in /home/reshajt1/public_html/wp-includes/category.php on line 381
Deprecated: Creation of dynamic property WP_Term::$category_nicename is deprecated in /home/reshajt1/public_html/wp-includes/category.php on line 382
Deprecated: Creation of dynamic property WP_Term::$category_parent is deprecated in /home/reshajt1/public_html/wp-includes/category.php on line 383
Deprecated: Implicit conversion from float 1789273704.559346 to int loses precision in /home/reshajt1/public_html/wp-content/plugins/intelly-related-posts/includes/classes/utils/Logger.php on line 93
Selamat datang di blog saya, kali ini saya akan membagikan tutorial bagaimana cara untuk mengamankan MySql dan mempercepat performa nya. Tentunya jika anda memiliki website atau program yang selalu menarik query dari mysql dengan user yang banyak, pasti nya anda harus membuat mysql berjalan dengan optimal. Bagaimana caranya, berikut adalah tutorial nya : Mengubah port …
Continue reading "Cara membuat Performa dan mengamankan MYSQL"
The post Cara membuat Performa dan mengamankan MYSQL appeared first on ReshaJTama.
]]>Deprecated: Creation of dynamic property WP_Block::$attributes is deprecated in /home/reshajt1/public_html/wp-includes/class-wp-block.php on line 179
Deprecated: Creation of dynamic property WP_Block::$attributes is deprecated in /home/reshajt1/public_html/wp-includes/class-wp-block.php on line 179
Deprecated: Creation of dynamic property WP_Block::$attributes is deprecated in /home/reshajt1/public_html/wp-includes/class-wp-block.php on line 179
Deprecated: Creation of dynamic property WP_Block::$attributes is deprecated in /home/reshajt1/public_html/wp-includes/class-wp-block.php on line 179
Deprecated: Creation of dynamic property WP_Block::$attributes is deprecated in /home/reshajt1/public_html/wp-includes/class-wp-block.php on line 179
Deprecated: Implicit conversion from float 1789273704.561044 to int loses precision in /home/reshajt1/public_html/wp-content/plugins/intelly-related-posts/includes/classes/utils/Logger.php on line 93
Deprecated: Implicit conversion from float 1789273704.561104 to int loses precision in /home/reshajt1/public_html/wp-content/plugins/intelly-related-posts/includes/classes/utils/Logger.php on line 93
- Mengubah port mysql
Seperti yang kita ketahui, mysql menggunakan port 3306 sebagai default port nya. Kita bisa mengubah default port nya sesuai dengan yang kita mau. Berikut adalah caranya :
Cari file my.ini mysql
- Note : Pada dasarnya file my.ini pada mysql di linux dan windows itu sama, hanya saja tempat nya yang berbeda.
- Buka my.ini pada config di xampp control panel
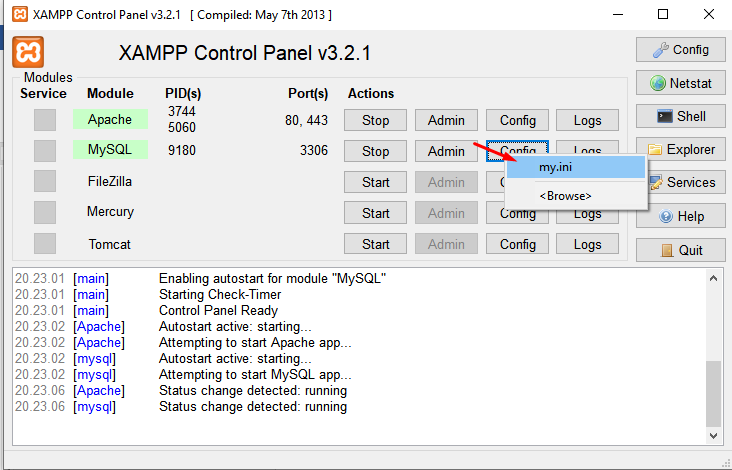
- Disini saya mengganti port nya menjadi 3307
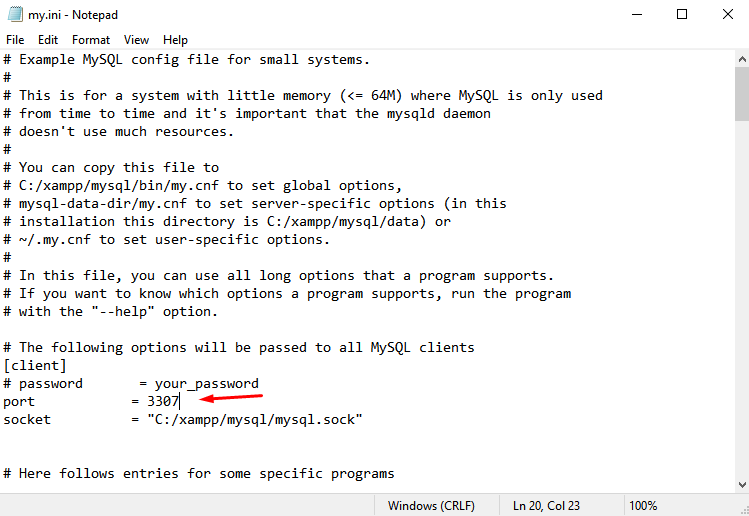
- Binding IP address
Terkadang orang sering lupa dengan settingan ini ?, walaupun sepele tetapi sangat fatal jika kita lupa mensetting nya. Dengan binding Ip address ini kita dapat mensetting siapa saja yang dapat melakukan akses terhadap mysql. Untuk settingan nya seperti ini :
- Masih di file My.ini yang seperti tadi
- Kemudian cari baris sepert berikut :
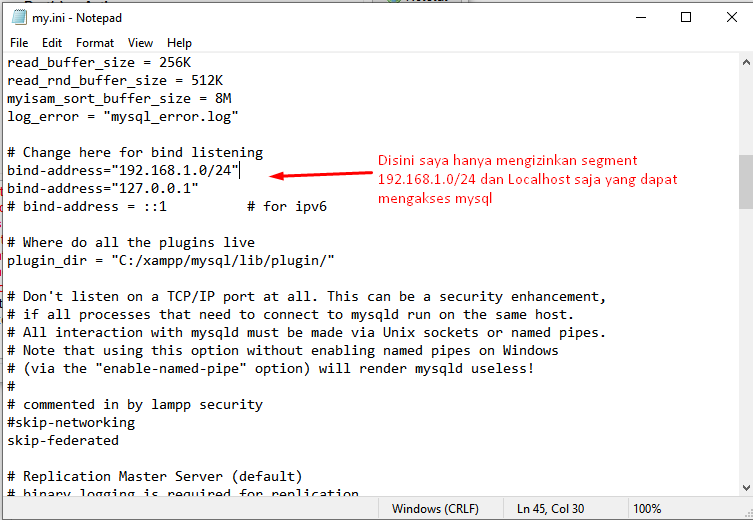
- Disini saya hanya memberi akses pada segment 192.168.1.0/24 yang hanya dapat mengakses Mysql tersebut
- Membuat Satu File per Table
Untuk apa settingan berikut ini ?, Settingan ini membuat file file kecil dalam setiap table yang anda buat pada mysql. Sehingga apabila terjadi rusak pada salah satu table, tidak merambat ke table lain. Berikut settingannya :
- Buka pada settingan My.ini tadi
- Masukan script berikut pada settingan mysql nya
- Memberikan RAM yang besar pada Mysql
Pada settingan ini pastikan anda memiliki RAM minimal 4 GB pada PC yang terinstall mysql server. Karena pada settingan ini akan mengizinkan Mysql untuk mengakses RAM anda, saya saran kan untuk settingan ini jangan memberikan Akses lebih dari 2 GB pada Mysql, karena saya pernah melakukan settingan lebih dari 2 GB dan Mysql tidak mau berjalan, tetapi jika anda bisa mengoprek nya agar bisa menjadi lebih optimal terserah anda, oke langsung ke caranya saja :
- Masih di File My.ini yang tadi
- Kemudian cari baris berikut pada my.ini, disini saya mensetting 2GB
Setelah melakukan optimasi, jangan lupa untuk merestart Mysql Sevice nya, kemudian silahkan bandingkan bagaimana performanya. Semoga bermanfaat dan jangan lupa untuk menshare nya ke teman teman anda. Terima kasih
The post Cara membuat Performa dan mengamankan MYSQL appeared first on ReshaJTama.
]]>Deprecated: Creation of dynamic property WP_Term::$cat_ID is deprecated in /home/reshajt1/public_html/wp-includes/category.php on line 378
Deprecated: Creation of dynamic property WP_Term::$category_count is deprecated in /home/reshajt1/public_html/wp-includes/category.php on line 379
Deprecated: Creation of dynamic property WP_Term::$category_description is deprecated in /home/reshajt1/public_html/wp-includes/category.php on line 380
Deprecated: Creation of dynamic property WP_Term::$cat_name is deprecated in /home/reshajt1/public_html/wp-includes/category.php on line 381
Deprecated: Creation of dynamic property WP_Term::$category_nicename is deprecated in /home/reshajt1/public_html/wp-includes/category.php on line 382
Deprecated: Creation of dynamic property WP_Term::$category_parent is deprecated in /home/reshajt1/public_html/wp-includes/category.php on line 383
Deprecated: Creation of dynamic property WP_Term::$cat_ID is deprecated in /home/reshajt1/public_html/wp-includes/category.php on line 378
Deprecated: Creation of dynamic property WP_Term::$category_count is deprecated in /home/reshajt1/public_html/wp-includes/category.php on line 379
Deprecated: Creation of dynamic property WP_Term::$category_description is deprecated in /home/reshajt1/public_html/wp-includes/category.php on line 380
Deprecated: Creation of dynamic property WP_Term::$cat_name is deprecated in /home/reshajt1/public_html/wp-includes/category.php on line 381
Deprecated: Creation of dynamic property WP_Term::$category_nicename is deprecated in /home/reshajt1/public_html/wp-includes/category.php on line 382
Deprecated: Creation of dynamic property WP_Term::$category_parent is deprecated in /home/reshajt1/public_html/wp-includes/category.php on line 383
Deprecated: Implicit conversion from float 1789273704.562148 to int loses precision in /home/reshajt1/public_html/wp-content/plugins/intelly-related-posts/includes/classes/utils/Logger.php on line 93
Selamat datang di blog saya, kali ini saya akan membuat tutorial untuk membuat user windows dengan command prompt. Biasanya kita membuat user windows dengan masuk ke control panel, tetapi cara itu agak memakan waktu, oleh karena itu kita bisa membuat user dengan command prompt. Berikut cara nya Masuk ke command prompt sebagai administrator Kemudian masukan …
Continue reading "Cara membuat User Windows Dengan CMD"
The post Cara membuat User Windows Dengan CMD appeared first on ReshaJTama.
]]>Deprecated: Creation of dynamic property WP_Block::$attributes is deprecated in /home/reshajt1/public_html/wp-includes/class-wp-block.php on line 179
Deprecated: Creation of dynamic property WP_Block::$attributes is deprecated in /home/reshajt1/public_html/wp-includes/class-wp-block.php on line 179
Deprecated: Creation of dynamic property WP_Block::$attributes is deprecated in /home/reshajt1/public_html/wp-includes/class-wp-block.php on line 179
Deprecated: Implicit conversion from float 1789273704.563463 to int loses precision in /home/reshajt1/public_html/wp-content/plugins/intelly-related-posts/includes/classes/utils/Logger.php on line 93
Deprecated: Implicit conversion from float 1789273704.563519 to int loses precision in /home/reshajt1/public_html/wp-content/plugins/intelly-related-posts/includes/classes/utils/Logger.php on line 93
- Masuk ke command prompt sebagai administrator
- Kemudian masukan perintah berikut
- Nama user : new_user
- Password : 123

- Jika kita ingin melihat user yang ada di computer tersebut, kita bisa mengetikan perintah berikut

- Kemudian jika anda lupa password dari salah satu akun tersebut, anda bisa menjalan kan perintah berikut untuk mengubah password nya dengan password baru, disini saya akan mengubah nya menjadi 321.

- Kemudian anda bisa mencoba nya dengan masuk ke akun tersebut
Share tutorial ini jika kalian ingin membagikan tutorial ini kepada teman anda, atau anda bisa comment jika memiliki pertanyaan.Berikut tutorial sederhana dari saya, semoga bermanfaat. Terima kasih.
The post Cara membuat User Windows Dengan CMD appeared first on ReshaJTama.
]]>Deprecated: Creation of dynamic property WP_Term::$cat_ID is deprecated in /home/reshajt1/public_html/wp-includes/category.php on line 378
Deprecated: Creation of dynamic property WP_Term::$category_count is deprecated in /home/reshajt1/public_html/wp-includes/category.php on line 379
Deprecated: Creation of dynamic property WP_Term::$category_description is deprecated in /home/reshajt1/public_html/wp-includes/category.php on line 380
Deprecated: Creation of dynamic property WP_Term::$cat_name is deprecated in /home/reshajt1/public_html/wp-includes/category.php on line 381
Deprecated: Creation of dynamic property WP_Term::$category_nicename is deprecated in /home/reshajt1/public_html/wp-includes/category.php on line 382
Deprecated: Creation of dynamic property WP_Term::$category_parent is deprecated in /home/reshajt1/public_html/wp-includes/category.php on line 383
Deprecated: Creation of dynamic property WP_Term::$cat_ID is deprecated in /home/reshajt1/public_html/wp-includes/category.php on line 378
Deprecated: Creation of dynamic property WP_Term::$category_count is deprecated in /home/reshajt1/public_html/wp-includes/category.php on line 379
Deprecated: Creation of dynamic property WP_Term::$category_description is deprecated in /home/reshajt1/public_html/wp-includes/category.php on line 380
Deprecated: Creation of dynamic property WP_Term::$cat_name is deprecated in /home/reshajt1/public_html/wp-includes/category.php on line 381
Deprecated: Creation of dynamic property WP_Term::$category_nicename is deprecated in /home/reshajt1/public_html/wp-includes/category.php on line 382
Deprecated: Creation of dynamic property WP_Term::$category_parent is deprecated in /home/reshajt1/public_html/wp-includes/category.php on line 383
Deprecated: Implicit conversion from float 1789273704.564592 to int loses precision in /home/reshajt1/public_html/wp-content/plugins/intelly-related-posts/includes/classes/utils/Logger.php on line 93
Selamat datang di Blog saya, kalian mungkin sering kesal jika saat membuka aplikasi harus menggunakan user administrator. padahal di settingan user kita sudah administrator. Oke, itu semua karena pada sistem Windows 8/8.1/10 mempunyai User Administrator dan juga ada yang Full Administrator. jadi kalian harus mengaktifkan nya terlebih dahulu melalui Policy setting. Pertama buka Windows -> …
Continue reading "Mengaktifkan User Full Administrator di Windows 8/8.1/10"
The post Mengaktifkan User Full Administrator di Windows 8/8.1/10 appeared first on ReshaJTama.
]]>Deprecated: Creation of dynamic property WP_Block::$attributes is deprecated in /home/reshajt1/public_html/wp-includes/class-wp-block.php on line 179
Deprecated: Creation of dynamic property WP_Block::$attributes is deprecated in /home/reshajt1/public_html/wp-includes/class-wp-block.php on line 179
Deprecated: Implicit conversion from float 1789273704.565828 to int loses precision in /home/reshajt1/public_html/wp-content/plugins/intelly-related-posts/includes/classes/utils/Logger.php on line 93
Deprecated: Implicit conversion from float 1789273704.565875 to int loses precision in /home/reshajt1/public_html/wp-content/plugins/intelly-related-posts/includes/classes/utils/Logger.php on line 93
Oke, itu semua karena pada sistem Windows 8/8.1/10 mempunyai User Administrator dan juga ada yang Full Administrator. jadi kalian harus mengaktifkan nya terlebih dahulu melalui Policy setting.
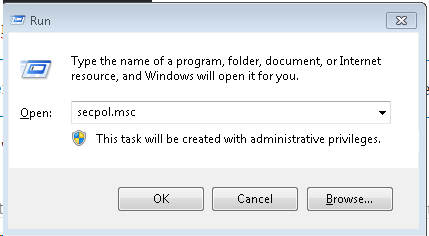
- Pertama buka Windows -> Run
- Kemudian ketikan perintah “secpol.msc” .
- Kemudian masuk ke Local Policies – > Security Options
- Enable User “Account : Administrator Account Status”
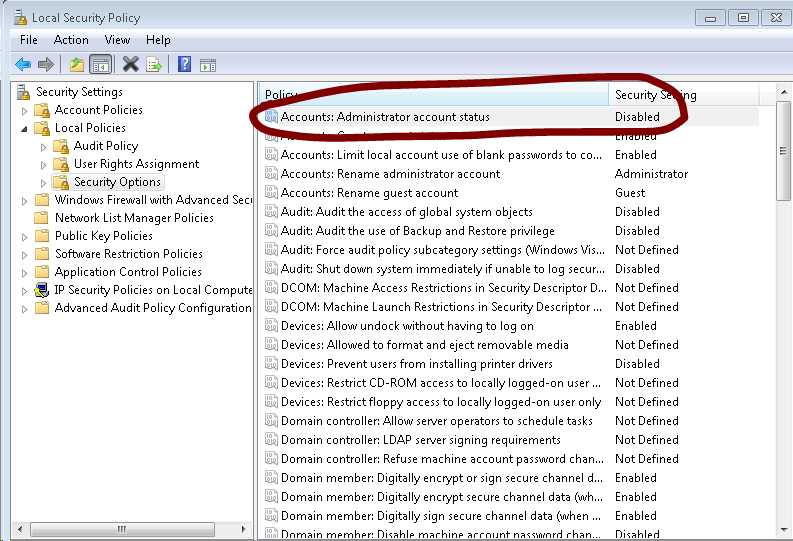
- Kemudian “Log out” dan coba lagi login dengan user Administrator
Ya berikut adalah tutorial sederhana saja. semoga berguna terima kasih telah berkunjung.
The post Mengaktifkan User Full Administrator di Windows 8/8.1/10 appeared first on ReshaJTama.
]]>Deprecated: Creation of dynamic property WP_Term::$cat_ID is deprecated in /home/reshajt1/public_html/wp-includes/category.php on line 378
Deprecated: Creation of dynamic property WP_Term::$category_count is deprecated in /home/reshajt1/public_html/wp-includes/category.php on line 379
Deprecated: Creation of dynamic property WP_Term::$category_description is deprecated in /home/reshajt1/public_html/wp-includes/category.php on line 380
Deprecated: Creation of dynamic property WP_Term::$cat_name is deprecated in /home/reshajt1/public_html/wp-includes/category.php on line 381
Deprecated: Creation of dynamic property WP_Term::$category_nicename is deprecated in /home/reshajt1/public_html/wp-includes/category.php on line 382
Deprecated: Creation of dynamic property WP_Term::$category_parent is deprecated in /home/reshajt1/public_html/wp-includes/category.php on line 383
Deprecated: Creation of dynamic property WP_Term::$cat_ID is deprecated in /home/reshajt1/public_html/wp-includes/category.php on line 378
Deprecated: Creation of dynamic property WP_Term::$category_count is deprecated in /home/reshajt1/public_html/wp-includes/category.php on line 379
Deprecated: Creation of dynamic property WP_Term::$category_description is deprecated in /home/reshajt1/public_html/wp-includes/category.php on line 380
Deprecated: Creation of dynamic property WP_Term::$cat_name is deprecated in /home/reshajt1/public_html/wp-includes/category.php on line 381
Deprecated: Creation of dynamic property WP_Term::$category_nicename is deprecated in /home/reshajt1/public_html/wp-includes/category.php on line 382
Deprecated: Creation of dynamic property WP_Term::$category_parent is deprecated in /home/reshajt1/public_html/wp-includes/category.php on line 383
Deprecated: Creation of dynamic property WP_Term::$cat_ID is deprecated in /home/reshajt1/public_html/wp-includes/category.php on line 378
Deprecated: Creation of dynamic property WP_Term::$category_count is deprecated in /home/reshajt1/public_html/wp-includes/category.php on line 379
Deprecated: Creation of dynamic property WP_Term::$category_description is deprecated in /home/reshajt1/public_html/wp-includes/category.php on line 380
Deprecated: Creation of dynamic property WP_Term::$cat_name is deprecated in /home/reshajt1/public_html/wp-includes/category.php on line 381
Deprecated: Creation of dynamic property WP_Term::$category_nicename is deprecated in /home/reshajt1/public_html/wp-includes/category.php on line 382
Deprecated: Creation of dynamic property WP_Term::$category_parent is deprecated in /home/reshajt1/public_html/wp-includes/category.php on line 383
Deprecated: Implicit conversion from float 1789273704.566965 to int loses precision in /home/reshajt1/public_html/wp-content/plugins/intelly-related-posts/includes/classes/utils/Logger.php on line 93
Berikut adalah cara untuk membuat user di system operasi Centos. Silahkan masuk ke Terminal dan ketikan perintah berikut : dan untuk men setting password nya silahkan masukan perintah berikut : Kemudian jika anda ingin user itu dapat hak akses sama dengan root, masuk ke settingan berikut dan tambahkan script berikut di paling bawah. kemudian tambahkan …
Continue reading "Cara membuat User yang setara Root di Centos"
The post Cara membuat User yang setara Root di Centos appeared first on ReshaJTama.
]]>Deprecated: Implicit conversion from float 1789273704.567528 to int loses precision in /home/reshajt1/public_html/wp-content/plugins/intelly-related-posts/includes/classes/utils/Logger.php on line 93
Deprecated: Implicit conversion from float 1789273704.567574 to int loses precision in /home/reshajt1/public_html/wp-content/plugins/intelly-related-posts/includes/classes/utils/Logger.php on line 93
useradd myUserdan untuk men setting password nya silahkan masukan perintah berikut :
passwd myUserKemudian jika anda ingin user itu dapat hak akses sama dengan root, masuk ke settingan berikut dan tambahkan script berikut di paling bawah.
nano /etc/aliaseskemudian tambahkan di paling bawah seperti ini
#  Aliases in this file will NOT be expanded in the header from
#  Mail, but WILL be visible over networks or from /bin/mail.
#
#       >>>>>>>>>>      The program "newaliases" must be run after
#       >> NOTE >>      this file is updated for any changes to
#       >>>>>>>>>>      show through to sendmail.
#

# Basic system aliases -- these MUST be present.
mailer-daemon:  postmaster
postmaster:     root

# General redirections for pseudo accounts.
bin:            root
daemon:         root
adm:            root
lp:             root
sync:           root
root:           myUser
kemudian reload service nya dengan perintah berikut :
newaliaseskemudian coba lagi masuk dengan user tersebut untuk edit file yang mempunyai privilage root
The post Cara membuat User yang setara Root di Centos appeared first on ReshaJTama.
]]>Deprecated: Creation of dynamic property WP_Term::$cat_ID is deprecated in /home/reshajt1/public_html/wp-includes/category.php on line 378
Deprecated: Creation of dynamic property WP_Term::$category_count is deprecated in /home/reshajt1/public_html/wp-includes/category.php on line 379
Deprecated: Creation of dynamic property WP_Term::$category_description is deprecated in /home/reshajt1/public_html/wp-includes/category.php on line 380
Deprecated: Creation of dynamic property WP_Term::$cat_name is deprecated in /home/reshajt1/public_html/wp-includes/category.php on line 381
Deprecated: Creation of dynamic property WP_Term::$category_nicename is deprecated in /home/reshajt1/public_html/wp-includes/category.php on line 382
Deprecated: Creation of dynamic property WP_Term::$category_parent is deprecated in /home/reshajt1/public_html/wp-includes/category.php on line 383
Deprecated: Creation of dynamic property WP_Term::$cat_ID is deprecated in /home/reshajt1/public_html/wp-includes/category.php on line 378
Deprecated: Creation of dynamic property WP_Term::$category_count is deprecated in /home/reshajt1/public_html/wp-includes/category.php on line 379
Deprecated: Creation of dynamic property WP_Term::$category_description is deprecated in /home/reshajt1/public_html/wp-includes/category.php on line 380
Deprecated: Creation of dynamic property WP_Term::$cat_name is deprecated in /home/reshajt1/public_html/wp-includes/category.php on line 381
Deprecated: Creation of dynamic property WP_Term::$category_nicename is deprecated in /home/reshajt1/public_html/wp-includes/category.php on line 382
Deprecated: Creation of dynamic property WP_Term::$category_parent is deprecated in /home/reshajt1/public_html/wp-includes/category.php on line 383
Deprecated: Creation of dynamic property WP_Term::$cat_ID is deprecated in /home/reshajt1/public_html/wp-includes/category.php on line 378
Deprecated: Creation of dynamic property WP_Term::$category_count is deprecated in /home/reshajt1/public_html/wp-includes/category.php on line 379
Deprecated: Creation of dynamic property WP_Term::$category_description is deprecated in /home/reshajt1/public_html/wp-includes/category.php on line 380
Deprecated: Creation of dynamic property WP_Term::$cat_name is deprecated in /home/reshajt1/public_html/wp-includes/category.php on line 381
Deprecated: Creation of dynamic property WP_Term::$category_nicename is deprecated in /home/reshajt1/public_html/wp-includes/category.php on line 382
Deprecated: Creation of dynamic property WP_Term::$category_parent is deprecated in /home/reshajt1/public_html/wp-includes/category.php on line 383
Deprecated: Creation of dynamic property WP_Term::$cat_ID is deprecated in /home/reshajt1/public_html/wp-includes/category.php on line 378
Deprecated: Creation of dynamic property WP_Term::$category_count is deprecated in /home/reshajt1/public_html/wp-includes/category.php on line 379
Deprecated: Creation of dynamic property WP_Term::$category_description is deprecated in /home/reshajt1/public_html/wp-includes/category.php on line 380
Deprecated: Creation of dynamic property WP_Term::$cat_name is deprecated in /home/reshajt1/public_html/wp-includes/category.php on line 381
Deprecated: Creation of dynamic property WP_Term::$category_nicename is deprecated in /home/reshajt1/public_html/wp-includes/category.php on line 382
Deprecated: Creation of dynamic property WP_Term::$category_parent is deprecated in /home/reshajt1/public_html/wp-includes/category.php on line 383
Deprecated: Implicit conversion from float 1789273704.568617 to int loses precision in /home/reshajt1/public_html/wp-content/plugins/intelly-related-posts/includes/classes/utils/Logger.php on line 93
Berikut adalah tutorial untuk menembak komputer dengan system operasi Windows. Sedangkan kita memakai system operasi Centos. Bagaimana cara untuk meremote komputer tersebut ?. Kalian jangan khawatir, karena kalian hanya perlu menginstall package berikut agar dapat terkoneksi dengan windows. setelah selesai install. anda tinggal menjalankan perintah berikut : # -g = Resolusi layar# -u = Users …
Continue reading "Cara Remote Windows Dengan RDP dari Centos"
The post Cara Remote Windows Dengan RDP dari Centos appeared first on ReshaJTama.
]]>Deprecated: Implicit conversion from float 1789273704.569073 to int loses precision in /home/reshajt1/public_html/wp-content/plugins/intelly-related-posts/includes/classes/utils/Logger.php on line 93
Deprecated: Implicit conversion from float 1789273704.569116 to int loses precision in /home/reshajt1/public_html/wp-content/plugins/intelly-related-posts/includes/classes/utils/Logger.php on line 93
Kalian jangan khawatir, karena kalian hanya perlu menginstall package berikut agar dapat terkoneksi dengan windows.
yum install -y freerdp setelah selesai install. anda tinggal menjalankan perintah berikut :
xfreerdp 0g 800x600 -u myUsers 192.168.1.1
connected to 192.168.1.1:3389
Password: #masukan password nya
# -g = Resolusi layar
# -u = Users RDP nya
Dan anda akhirnya dapat terkoneksi dengan layanan RDP milik si Windows
The post Cara Remote Windows Dengan RDP dari Centos appeared first on ReshaJTama.
]]>Deprecated: Creation of dynamic property WP_Term::$cat_ID is deprecated in /home/reshajt1/public_html/wp-includes/category.php on line 378
Deprecated: Creation of dynamic property WP_Term::$category_count is deprecated in /home/reshajt1/public_html/wp-includes/category.php on line 379
Deprecated: Creation of dynamic property WP_Term::$category_description is deprecated in /home/reshajt1/public_html/wp-includes/category.php on line 380
Deprecated: Creation of dynamic property WP_Term::$cat_name is deprecated in /home/reshajt1/public_html/wp-includes/category.php on line 381
Deprecated: Creation of dynamic property WP_Term::$category_nicename is deprecated in /home/reshajt1/public_html/wp-includes/category.php on line 382
Deprecated: Creation of dynamic property WP_Term::$category_parent is deprecated in /home/reshajt1/public_html/wp-includes/category.php on line 383
Deprecated: Creation of dynamic property WP_Term::$cat_ID is deprecated in /home/reshajt1/public_html/wp-includes/category.php on line 378
Deprecated: Creation of dynamic property WP_Term::$category_count is deprecated in /home/reshajt1/public_html/wp-includes/category.php on line 379
Deprecated: Creation of dynamic property WP_Term::$category_description is deprecated in /home/reshajt1/public_html/wp-includes/category.php on line 380
Deprecated: Creation of dynamic property WP_Term::$cat_name is deprecated in /home/reshajt1/public_html/wp-includes/category.php on line 381
Deprecated: Creation of dynamic property WP_Term::$category_nicename is deprecated in /home/reshajt1/public_html/wp-includes/category.php on line 382
Deprecated: Creation of dynamic property WP_Term::$category_parent is deprecated in /home/reshajt1/public_html/wp-includes/category.php on line 383
Deprecated: Creation of dynamic property WP_Term::$cat_ID is deprecated in /home/reshajt1/public_html/wp-includes/category.php on line 378
Deprecated: Creation of dynamic property WP_Term::$category_count is deprecated in /home/reshajt1/public_html/wp-includes/category.php on line 379
Deprecated: Creation of dynamic property WP_Term::$category_description is deprecated in /home/reshajt1/public_html/wp-includes/category.php on line 380
Deprecated: Creation of dynamic property WP_Term::$cat_name is deprecated in /home/reshajt1/public_html/wp-includes/category.php on line 381
Deprecated: Creation of dynamic property WP_Term::$category_nicename is deprecated in /home/reshajt1/public_html/wp-includes/category.php on line 382
Deprecated: Creation of dynamic property WP_Term::$category_parent is deprecated in /home/reshajt1/public_html/wp-includes/category.php on line 383
Deprecated: Implicit conversion from float 1789273704.570169 to int loses precision in /home/reshajt1/public_html/wp-content/plugins/intelly-related-posts/includes/classes/utils/Logger.php on line 93
Selamat datang di Blog saya. Kali ini saya akan membagikan cara untuk menginstall Packet Tracert di linux. Packet Tracert adalah software simulasi yang di sediakan oleh Cisco sebagai vendor dari alat – alat Networking untuk dapat mempelajari configurasi dalam aplikasi tersebut. Oke, langsung saja ke step – step nya. Pertama kalian harus download file dari …
Continue reading "Install Packet Tracert di Linux"
The post Install Packet Tracert di Linux appeared first on ReshaJTama.
]]>Deprecated: Implicit conversion from float 1789273704.570788 to int loses precision in /home/reshajt1/public_html/wp-content/plugins/intelly-related-posts/includes/classes/utils/Logger.php on line 93
Deprecated: Implicit conversion from float 1789273704.570831 to int loses precision in /home/reshajt1/public_html/wp-content/plugins/intelly-related-posts/includes/classes/utils/Logger.php on line 93
Oke, langsung saja ke step – step nya.
- Pertama kalian harus download file dari Cisco Packet Tracert nya. Kalian bisa mendownload di official Page dari Cisco nya sendiri.
- Setelah mendownload, silahkan kalian masuk ke Terminal dan berikan akses untuk file tersebut
chmod -R 755 "Packet Tracert.tar.gz"- Setelah itu unzip file tar.gz nya dengan perintah berikut
tar -xvf "Packet Tracert.tar.gz"- Tunggu file tersebut akan meng exstrak semua file nya.
- Setelah selesai, jalankan perintah berikut
./install- Kemudian anda tunggu sampai selesai penginstallan nya
- Jika ada permintaan Persetujuan EULA, anda ketik “Yes” saja
- Setelah anda install, anda dapat memanggil packet tracer dari terminal dengan perintah berikut
packettracerYa, seperti itu lah teman – teman. selamat belajar packet tracer di linux anda. semoga artikel ini bermanfaat, terima kasih telah berkunjung
The post Install Packet Tracert di Linux appeared first on ReshaJTama.
]]>Deprecated: Creation of dynamic property WP_Term::$cat_ID is deprecated in /home/reshajt1/public_html/wp-includes/category.php on line 378
Deprecated: Creation of dynamic property WP_Term::$category_count is deprecated in /home/reshajt1/public_html/wp-includes/category.php on line 379
Deprecated: Creation of dynamic property WP_Term::$category_description is deprecated in /home/reshajt1/public_html/wp-includes/category.php on line 380
Deprecated: Creation of dynamic property WP_Term::$cat_name is deprecated in /home/reshajt1/public_html/wp-includes/category.php on line 381
Deprecated: Creation of dynamic property WP_Term::$category_nicename is deprecated in /home/reshajt1/public_html/wp-includes/category.php on line 382
Deprecated: Creation of dynamic property WP_Term::$category_parent is deprecated in /home/reshajt1/public_html/wp-includes/category.php on line 383
Deprecated: Creation of dynamic property WP_Term::$cat_ID is deprecated in /home/reshajt1/public_html/wp-includes/category.php on line 378
Deprecated: Creation of dynamic property WP_Term::$category_count is deprecated in /home/reshajt1/public_html/wp-includes/category.php on line 379
Deprecated: Creation of dynamic property WP_Term::$category_description is deprecated in /home/reshajt1/public_html/wp-includes/category.php on line 380
Deprecated: Creation of dynamic property WP_Term::$cat_name is deprecated in /home/reshajt1/public_html/wp-includes/category.php on line 381
Deprecated: Creation of dynamic property WP_Term::$category_nicename is deprecated in /home/reshajt1/public_html/wp-includes/category.php on line 382
Deprecated: Creation of dynamic property WP_Term::$category_parent is deprecated in /home/reshajt1/public_html/wp-includes/category.php on line 383
Deprecated: Creation of dynamic property WP_Term::$cat_ID is deprecated in /home/reshajt1/public_html/wp-includes/category.php on line 378
Deprecated: Creation of dynamic property WP_Term::$category_count is deprecated in /home/reshajt1/public_html/wp-includes/category.php on line 379
Deprecated: Creation of dynamic property WP_Term::$category_description is deprecated in /home/reshajt1/public_html/wp-includes/category.php on line 380
Deprecated: Creation of dynamic property WP_Term::$cat_name is deprecated in /home/reshajt1/public_html/wp-includes/category.php on line 381
Deprecated: Creation of dynamic property WP_Term::$category_nicename is deprecated in /home/reshajt1/public_html/wp-includes/category.php on line 382
Deprecated: Creation of dynamic property WP_Term::$category_parent is deprecated in /home/reshajt1/public_html/wp-includes/category.php on line 383
Deprecated: Creation of dynamic property WP_Term::$cat_ID is deprecated in /home/reshajt1/public_html/wp-includes/category.php on line 378
Deprecated: Creation of dynamic property WP_Term::$category_count is deprecated in /home/reshajt1/public_html/wp-includes/category.php on line 379
Deprecated: Creation of dynamic property WP_Term::$category_description is deprecated in /home/reshajt1/public_html/wp-includes/category.php on line 380
Deprecated: Creation of dynamic property WP_Term::$cat_name is deprecated in /home/reshajt1/public_html/wp-includes/category.php on line 381
Deprecated: Creation of dynamic property WP_Term::$category_nicename is deprecated in /home/reshajt1/public_html/wp-includes/category.php on line 382
Deprecated: Creation of dynamic property WP_Term::$category_parent is deprecated in /home/reshajt1/public_html/wp-includes/category.php on line 383
Deprecated: Implicit conversion from float 1789273704.572149 to int loses precision in /home/reshajt1/public_html/wp-content/plugins/intelly-related-posts/includes/classes/utils/Logger.php on line 93
Halo kawan – kawan. Kali ini saya akan membagikan tutorial mengenai SAMBA Server. Mungkin kalian semua sudah tau dengan Server ini. SAMBA di gunakan untuk mensharing folder agar bisa di akses oleh komputer lain. Sebagai study kasus nya seperti ini. disini saya mempunyai komputer dengan IP 192.168.1.1 dengan system operasi Linux, saya ingin mengakses file …
Continue reading "Membuat SAMBA Server untuk folder Sharing di Linux"
The post Membuat SAMBA Server untuk folder Sharing di Linux appeared first on ReshaJTama.
]]>Deprecated: Implicit conversion from float 1789273704.572828 to int loses precision in /home/reshajt1/public_html/wp-content/plugins/intelly-related-posts/includes/classes/utils/Logger.php on line 93
Deprecated: Implicit conversion from float 1789273704.572881 to int loses precision in /home/reshajt1/public_html/wp-content/plugins/intelly-related-posts/includes/classes/utils/Logger.php on line 93
Sebagai study kasus nya seperti ini. disini saya mempunyai komputer dengan IP 192.168.1.1 dengan system operasi Linux, saya ingin mengakses file Document yang ada di IP 192.168.1.1 dari komputer saya yang mempunyai system operasi Windows dengan IP 192.168.1.2. Jadi bagaimana solusi nya. Ya, saat nya kita gunakan SAMBA Server ini.
Berikut step – step nya :
- Install package SAMBA nya dengan terminal
sudo apt-get install samba- Kemudian masuk ke file konfigurasi SAMBA nya di
nano /etc/samba/smb.conf- kemudian akan muncul file seperti ini
#
# Sample configuration file for the Samba suite for Debian GNU/Linux.
#
#
# This is the main Samba configuration file. You should read the
# smb.conf(5) manual page in order to understand the options listed
# here. Samba has a huge number of configurable options most of which
# are not shown in this example
#
# Some options that are often worth tuning have been included as
# commented-out examples in this file.
#  - When such options are commented with ";", the proposed setting
#    differs from the default Samba behaviour
#  - When commented with "#", the proposed setting is the default
#    behaviour of Samba but the option is considered important
#    enough to be mentioned here
#
# NOTE: Whenever you modify this file you should run the command
# "testparm" to check that you have not made any basic syntactic
# errors.

#======================= Global Settings =======================

[global]

## Browsing/Identification ###

# Change this to the workgroup/NT-domain name your Samba server will part of
   workgroup = WORKGROUP

# server string is the equivalent of the NT Description field
	server string = %h server (Samba, Linux Mint)

# Windows Internet Name Serving Support Section:
# WINS Support - Tells the NMBD component of Samba to enable its WINS Server
#   wins support = no

# WINS Server - Tells the NMBD components of Samba to be a WINS Client
# Note: Samba can be either a WINS Server, or a WINS Client, but NOT both
;   wins server = w.x.y.z

# This will prevent nmbd to search for NetBIOS names through DNS.
   dns proxy = no

#### Networking ####

# The specific set of interfaces / networks to bind to
# This can be either the interface name or an IP address/netmask;
# interface names are normally preferred
;   interfaces = 127.0.0.0/8 eth0

# Only bind to the named interfaces and/or networks; you must use the
# 'interfaces' option above to use this.
# It is recommended that you enable this feature if your Samba machine is
# not protected by a firewall or is a firewall itself.  However, this
# option cannot handle dynamic or non-broadcast interfaces correctly.
;   bind interfaces only = yes


#### Debugging/Accounting ####

# This tells Samba to use a separate log file for each machine
# that connects
   log file = /var/log/samba/log.%m

# Cap the size of the individual log files (in KiB).
   max log size = 1000

# If you want Samba to only log through syslog then set the following
# parameter to 'yes'.
#   syslog only = no

# We want Samba to log a minimum amount of information to syslog. Everything
# should go to /var/log/samba/log.{smbd,nmbd} instead. If you want to log
# through syslog you should set the following parameter to something higher.
   syslog = 0

# Do something sensible when Samba crashes: mail the admin a backtrace
   panic action = /usr/share/samba/panic-action %d


####### Authentication #######

# Server role. Defines in which mode Samba will operate. Possible
# values are "standalone server", "member server", "classic primary
# domain controller", "classic backup domain controller", "active
# directory domain controller".
#
# Most people will want "standalone sever" or "member server".
# Running as "active directory domain controller" will require first
# running "samba-tool domain provision" to wipe databases and create a
# new domain.
   server role = standalone server

# If you are using encrypted passwords, Samba will need to know what
# password database type you are using.
   passdb backend = tdbsam

   obey pam restrictions = yes

# This boolean parameter controls whether Samba attempts to sync the Unix
# password with the SMB password when the encrypted SMB password in the
# passdb is changed.
   unix password sync = yes

# For Unix password sync to work on a Debian GNU/Linux system, the following
# parameters must be set (thanks to Ian Kahan <<kahan@informatik.tu-muenchen.de> for
# sending the correct chat script for the passwd program in Debian Sarge).
   passwd program = /usr/bin/passwd %u
   passwd chat = *Enter\snew\s*\spassword:* %n\n *Retype\snew\s*\spassword:* %n\n *password\supdated\ssuccessfully* .

# This boolean controls whether PAM will be used for password changes
# when requested by an SMB client instead of the program listed in
# 'passwd program'. The default is 'no'.
   pam password change = yes

# This option controls how unsuccessful authentication attempts are mapped
# to anonymous connections
   map to guest = bad user

########## Domains ###########

#
# The following settings only takes effect if 'server role = primary
# classic domain controller', 'server role = backup domain controller'
# or 'domain logons' is set
#

# It specifies the location of the user's
# profile directory from the client point of view) The following
# required a [profiles] share to be setup on the samba server (see
# below)
;   logon path = \\%N\profiles\%U
# Another common choice is storing the profile in the user's home directory
# (this is Samba's default)
#   logon path = \\%N\%U\profile

# The following setting only takes effect if 'domain logons' is set
# It specifies the location of a user's home directory (from the client
# point of view)
;   logon drive = H:
#   logon home = \\%N\%U

# The following setting only takes effect if 'domain logons' is set
# It specifies the script to run during logon. The script must be stored
# in the [netlogon] share
# NOTE: Must be store in 'DOS' file format convention
;   logon script = logon.cmd

# This allows Unix users to be created on the domain controller via the SAMR
# RPC pipe.  The example command creates a user account with a disabled Unix
# password; please adapt to your needs
; add user script = /usr/sbin/adduser --quiet --disabled-password --gecos "" %u

# This allows machine accounts to be created on the domain controller via the
# SAMR RPC pipe.
# The following assumes a "machines" group exists on the system
; add machine script  = /usr/sbin/useradd -g machines -c "%u machine account" -d /var/lib/samba -s /bin/false %u

# This allows Unix groups to be created on the domain controller via the SAMR
# RPC pipe.
; add group script = /usr/sbin/addgroup --force-badname %g

############ Misc ############

# Using the following line enables you to customise your configuration
# on a per machine basis. The %m gets replaced with the netbios name
# of the machine that is connecting
;   include = /home/samba/etc/smb.conf.%m

# Some defaults for winbind (make sure you're not using the ranges
# for something else.)
;   idmap uid = 10000-20000
;   idmap gid = 10000-20000
;   template shell = /bin/bash

# Setup usershare options to enable non-root users to share folders
# with the net usershare command.

# Maximum number of usershare. 0 (default) means that usershare is disabled.
;   usershare max shares = 100

# Allow users who've been granted usershare privileges to create
# public shares, not just authenticated ones
   usershare allow guests = yes

#======================= Share Definitions =======================

# Un-comment the following (and tweak the other settings below to suit)
# to enable the default home directory shares. This will share each
# user's home directory as \\server\username
;[homes]
;   comment = Home Directories
;   browseable = no

# By default, the home directories are exported read-only. Change the
# next parameter to 'no' if you want to be able to write to them.
;   read only = yes

# File creation mask is set to 0700 for security reasons. If you want to
# create files with group=rw permissions, set next parameter to 0775.
;   create mask = 0700

# Directory creation mask is set to 0700 for security reasons. If you want to
# create dirs. with group=rw permissions, set next parameter to 0775.
;   directory mask = 0700

# By default, \\server\username shares can be connected to by anyone
# with access to the samba server.
# Un-comment the following parameter to make sure that only "username"
# can connect to \\server\username
# This might need tweaking when using external authentication schemes
;   valid users = %S

# Un-comment the following and create the netlogon directory for Domain Logons
# (you need to configure Samba to act as a domain controller too.)
;[netlogon]
;   comment = Network Logon Service
;   path = /home/samba/netlogon
;   guest ok = yes
;   read only = yes

# Un-comment the following and create the profiles directory to store
# users profiles (see the "logon path" option above)
# (you need to configure Samba to act as a domain controller too.)
# The path below should be writable by all users so that their
# profile directory may be created the first time they log on
;[profiles]
;   comment = Users profiles
;   path = /home/samba/profiles
;   guest ok = no
;   browseable = no
;   create mask = 0600
;   directory mask = 0700

[printers]
   comment = All Printers
   browseable = no
   path = /var/spool/samba
   printable = yes
   guest ok = no
   read only = yes
   create mask = 0700

# Windows clients look for this share name as a source of downloadable
# printer drivers
[print$]
   comment = Printer Drivers
   path = /var/lib/samba/printers
   browseable = yes
   read only = yes
   guest ok = no
# Uncomment to allow remote administration of Windows print drivers.
# You may need to replace 'lpadmin' with the name of the group your
# admin users are members of.
# Please note that you also need to set appropriate Unix permissions
# to the drivers directory for these users to have write rights in it
;   write list = root, @lpadmin

[Foldershare]
   comment = "My Sharing Files" # Tag Comment
   browseable = Yes #akses untuk mencari file
   path = /myfoldershare #ffolder yang ingin di akses
   guest ok = no # mengizinkan user anonym atau guest untuk mengakses
   read only = yes # Hanya dapat melihat, tidak dapat mengedit
   writeable = yes # dapat mengedit file
Tambahkan Foldershare berikut di akhir dari script.
- kemudian kita buat user untuk dapat mengakses SAMBA Server kita dengan perintah
adduser user01- Lalu masukan perintah berikut untuk memberikan akses user tersebut ke SAMBA
smbpasswd -a user01Kemudian masukan password yang akan di gunakan oleh user tersebut. dan SAMBA Server sudah dapat di gunakan untuk Folder Share dengan komputer lain.
Jika ada pertanyaan, silahkan komentar di bawah. Terima kasih
The post Membuat SAMBA Server untuk folder Sharing di Linux appeared first on ReshaJTama.
]]>Deprecated: Creation of dynamic property WP_Term::$cat_ID is deprecated in /home/reshajt1/public_html/wp-includes/category.php on line 378
Deprecated: Creation of dynamic property WP_Term::$category_count is deprecated in /home/reshajt1/public_html/wp-includes/category.php on line 379
Deprecated: Creation of dynamic property WP_Term::$category_description is deprecated in /home/reshajt1/public_html/wp-includes/category.php on line 380
Deprecated: Creation of dynamic property WP_Term::$cat_name is deprecated in /home/reshajt1/public_html/wp-includes/category.php on line 381
Deprecated: Creation of dynamic property WP_Term::$category_nicename is deprecated in /home/reshajt1/public_html/wp-includes/category.php on line 382
Deprecated: Creation of dynamic property WP_Term::$category_parent is deprecated in /home/reshajt1/public_html/wp-includes/category.php on line 383
Deprecated: Creation of dynamic property WP_Term::$cat_ID is deprecated in /home/reshajt1/public_html/wp-includes/category.php on line 378
Deprecated: Creation of dynamic property WP_Term::$category_count is deprecated in /home/reshajt1/public_html/wp-includes/category.php on line 379
Deprecated: Creation of dynamic property WP_Term::$category_description is deprecated in /home/reshajt1/public_html/wp-includes/category.php on line 380
Deprecated: Creation of dynamic property WP_Term::$cat_name is deprecated in /home/reshajt1/public_html/wp-includes/category.php on line 381
Deprecated: Creation of dynamic property WP_Term::$category_nicename is deprecated in /home/reshajt1/public_html/wp-includes/category.php on line 382
Deprecated: Creation of dynamic property WP_Term::$category_parent is deprecated in /home/reshajt1/public_html/wp-includes/category.php on line 383
Deprecated: Implicit conversion from float 1789273704.573929 to int loses precision in /home/reshajt1/public_html/wp-content/plugins/intelly-related-posts/includes/classes/utils/Logger.php on line 93
Halo Kawan – kawan, kali ini saya akan membagikan tutorial menggunakan Ngrok untuk menforward Web local kita dapat di akses di IP Public. Hal yang anda butuhkan untuk membuat nya adalah sebagai berikut. Akun Ngrok Web Server Localhost Oke disini saya anggap kalau kalian sudah punya web server sendiri ya. Kalau anda masih bingung dengan …
Continue reading "Membuat Web Local di Akses Public dengan Ngrok"
The post Membuat Web Local di Akses Public dengan Ngrok appeared first on ReshaJTama.
]]>Deprecated: Creation of dynamic property WP_Block::$attributes is deprecated in /home/reshajt1/public_html/wp-includes/class-wp-block.php on line 179
Deprecated: Creation of dynamic property WP_Block::$attributes is deprecated in /home/reshajt1/public_html/wp-includes/class-wp-block.php on line 179
Deprecated: Implicit conversion from float 1789273704.575261 to int loses precision in /home/reshajt1/public_html/wp-content/plugins/intelly-related-posts/includes/classes/utils/Logger.php on line 93
Deprecated: Implicit conversion from float 1789273704.575315 to int loses precision in /home/reshajt1/public_html/wp-content/plugins/intelly-related-posts/includes/classes/utils/Logger.php on line 93
- Akun Ngrok
- Web Server Localhost
Oke disini saya anggap kalau kalian sudah punya web server sendiri ya. Kalau anda masih bingung dengan web server nya, anda bisa melihat postingan saya tentang Web server.
Sekarang anda download Ngrok nya. kemudian kalian unzip file ngrok nya dan jalankan. maka akan banyak perintah – perintah untuk ngrok itu sendiri. jalankan perintah berikut untuk autentifikasi komputer kita ke ngrok nya
./ngrok authtoken Auth_token_andasetelah itu jalankan perintah berikut untuk menjalankan webserver anda di ip public
./ngrok http 80Disini anda juga dapat menjalan kan webserver dari Web server lain. Sebagai Study kasus anda dapat melihat topologi berikut ini

Disini saya ingin menjalankan Web Server di IP 192.168.1.1 dari Komp Anda dengan IP 192.168.1.10. Perintah yang di gunakan adalah sebagai berikut :
./ngrok http 192.168.1.1:80Kalian juga dapat memforward service lain selain http lo. Kalian dapat menjalankan MySQL, Remote Desktop, Telnet, SSH, dan lain lain. Disini kalian hanya menjalankan perintah berikut :
./ngrok tcp 129.168.1.1:22Kalau sudah tampil seperti berikut ini , anda tinggal mengakses nya dengan subdomain yang di beri oleh aplikasi tersebut dan mengakses nya.

anda tinggal mengakses 0.tcp.ngrok.io:19784 itu di putty atau aplikasi lain untuk mengakses SSH.
The post Membuat Web Local di Akses Public dengan Ngrok appeared first on ReshaJTama.
]]>